
Take a spin around the technical universe, and you will see that serverless computing is all the rage these days. Serverless computing doesn’t mean that there are no servers running your code. In the most popular use of the word, it simply means that you, the developer, don’t have to worry about it. Someone else has, and will monitor your service and make sure you have the right infrastructure and scalability in place.
Public Cloud providers like AWS and Google are simplifying the process for developers to leverage this architectural design concept. Do a quick search on the “serverless” keyword and the most popular related topics are in fact AWS with IoT being a close second.
For software developers, serverless computing opens a world of possibilities as well as new security concerns. One of those concerns is how to handle whitelisting your service’s IP address for third party APIs on an infrastructure where IPs change quite frequently. For example, AWS released a post on this very subject & REST APIs where you can see what the IP ranges are at a given moment, saying:
You can expect it to change several times per week…
So, should we then specify a range of IPs in the API whitelist? Well, that would basically allow all of AWS to hit that third party API (not to mention some third party apis do not allow for a range). Not what you want, right?
Google’s implementation of serverless computing comes in the form of Google Cloud Functions, which was released in February 2016. At the time of this article, it is still an Alpha release and there is currently no way to define a static outgoing IP address. AWS’s implementation of serverless computing, called AWS Lambda functions has been in the wild for over a year now. As of February 2016, your Lambda functions can now access VPC resources. What does that mean for us? Simply put, we can now put them in a private subnet in our VPC and in essence assign static outgoing public IP addresses to them!
As a POC of this feature I decided to have a little fun with my latest game addiction, Clash of Clans. Over the next couple paragraphs I’ll walk you through how I configured my AWS Lambda behind a static public IP address, to then hit Clash of Clans’ public APIs.
Architectural Design
For this project we will need the following resources:
A VPC with:
- Public Subnet
- Private Subnet
- NAT Gateway
- Elastic IP
- 2 Routes (public/private)
- Internet Gateway
Lambda
API Gateway
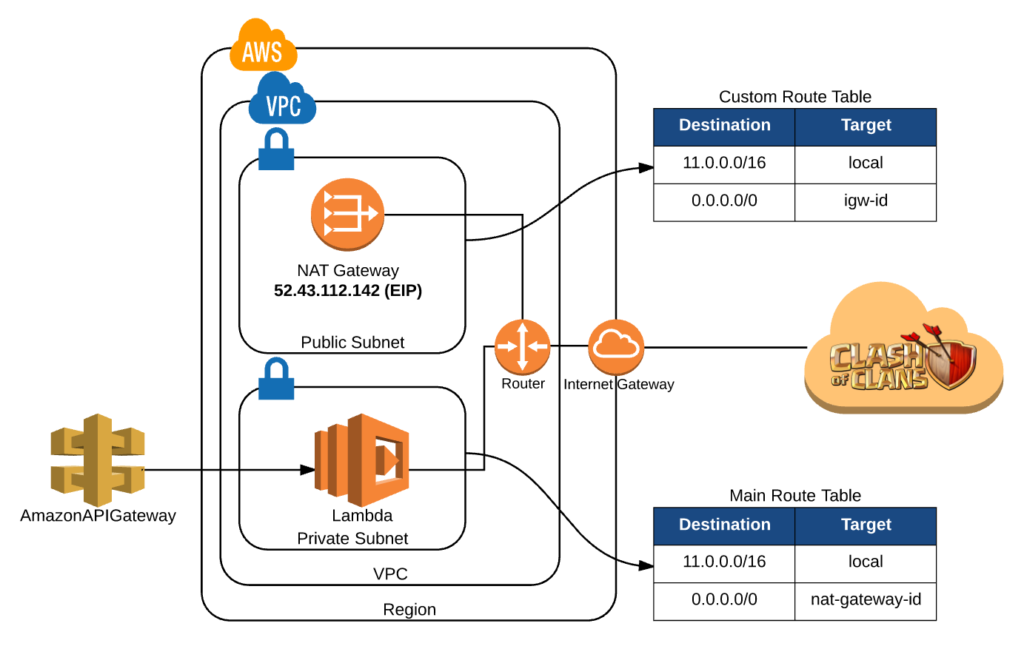
Following the digram, at a high level, this is what we need to do and, what these resources will do for us. First we will create a new VPC.
Next we will create 2 subnets. When you initially create a subnet it will get a default route and are both basically private subnets. Since we want one of these subnets to be public, we will create an Internet Gateway, and a new route that points all traffic to this gateway which we will then assign to our public subnet. Now any subsequent resources created in our public subnet will automatically get internet access, and as long as it has a public IP it will be publicly accessible to the outside world.
Then we will create a NAT Gateway in the public subnet. Its job is to provide internet access to resources in our private subnet. It will need a public IP which EIP (Elastic IP) will provide us with. At this point we will update our default route table (assigned to our private subnet) to route all web traffic to our NAT Gateway.
The last service we will need to configure is our AWS Lambda service. By using the microservice-http-endpoint blueprint, we will create a function that is publicly accessible with API Gateway. It will live in the private subnet of our newly minted VPC so that we can leverage the outgoing elastic IP address. The code will be very simple. It will make an authenticated HTTPS call to the Clash of Clans API and return the JSON object of the top ten international clans.
Resource Creation
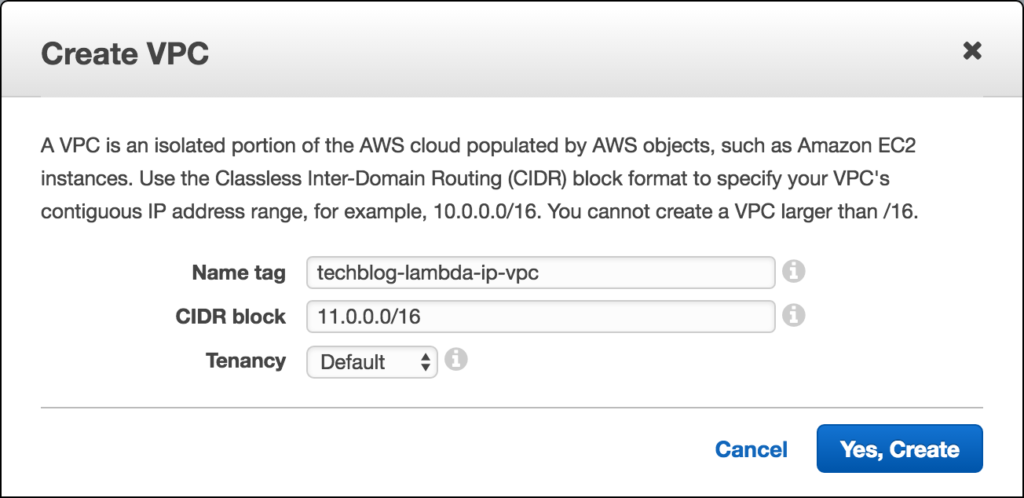
Step 1: Create a new VPC
Head over to your AWS VPC dashboard and click on over to your list of VPCs. If you have never done anything with VPCs you will see a default VPC that AWS gives you out of the box. Click on the Create VPC link and enter in a meaningful name for you VPC. For example I used:
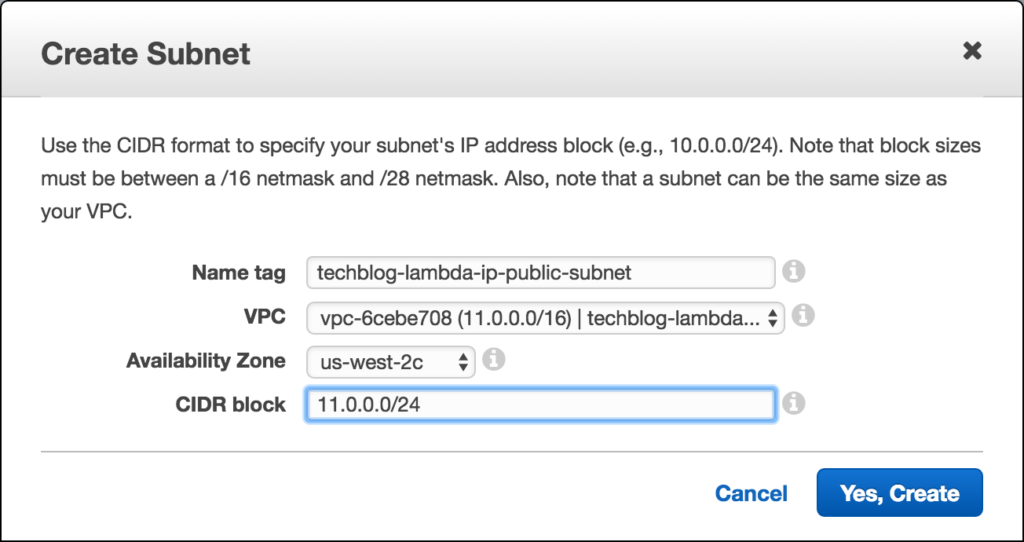
Step 2: Create 2 Subnets
Now we are going to go to the Subnets page and create two subnets. One public and one private. (For availability purposes you would want to have multiple private subnets in different availability zones for your lambda to run on. For simplicity sake we will stick to one here) In the Subnet tab click on “Create Subnet”. For the name tag, make sure to include “Private subnet” in one and in the other “Public Subnet,” choose our newly created VPC, and select an availability zone (us-west-2c for example). For CIDR block use the same IP Range as your public subnet, but increment the 3rd octet by 1 from the highest number in your subnets in the same VPC. For example:

Step 3: Create an Internet Gateway
Next we will head over to the Internet Gateway view, click on Create Internet Gateway and tag it with a descriptive tag.

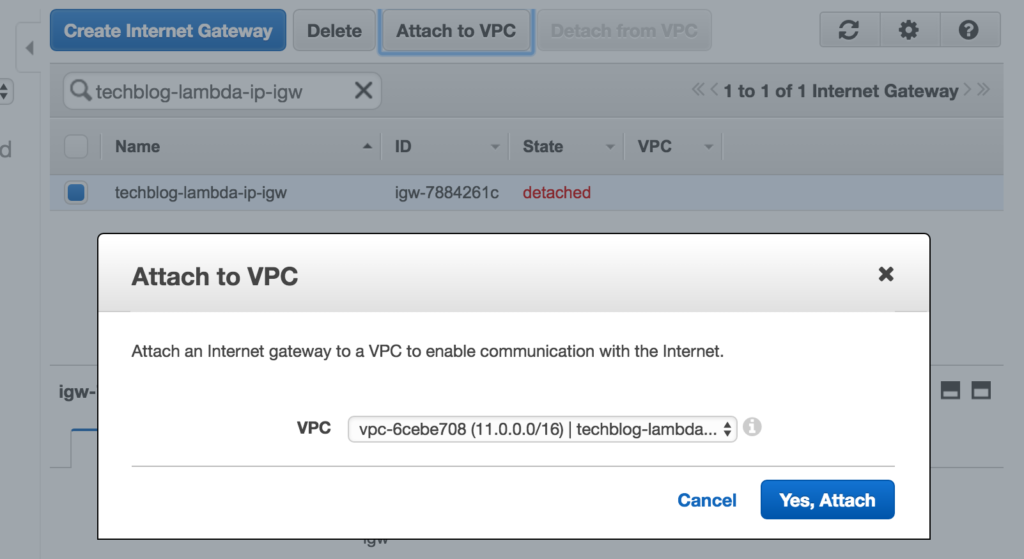
Then, we will click on our new internet gateway, and click on Attach to VPC, to attach it to our newly minted VPC like this:
Step 4: Create a public Route Table and Assign it to our public route
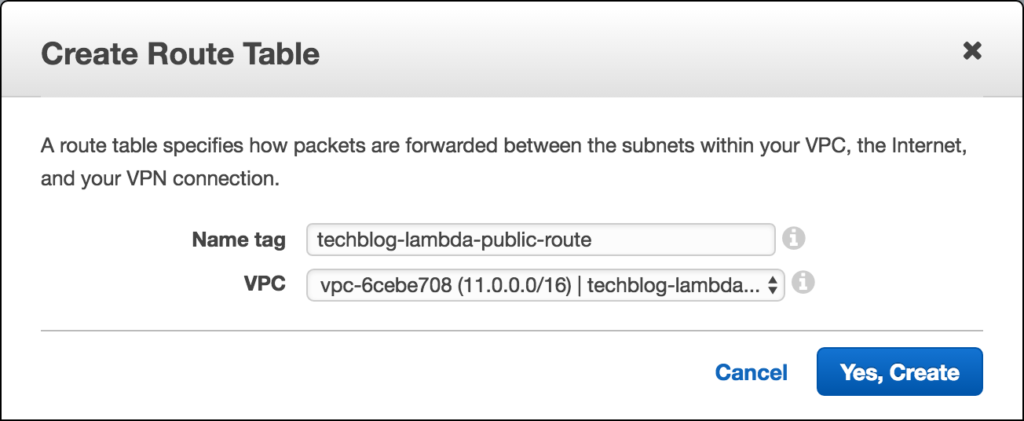
Now that that is done we can head over to our Route Tables view and click on Create Route Table, giving it a descriptive tag and linking it to our VPC:
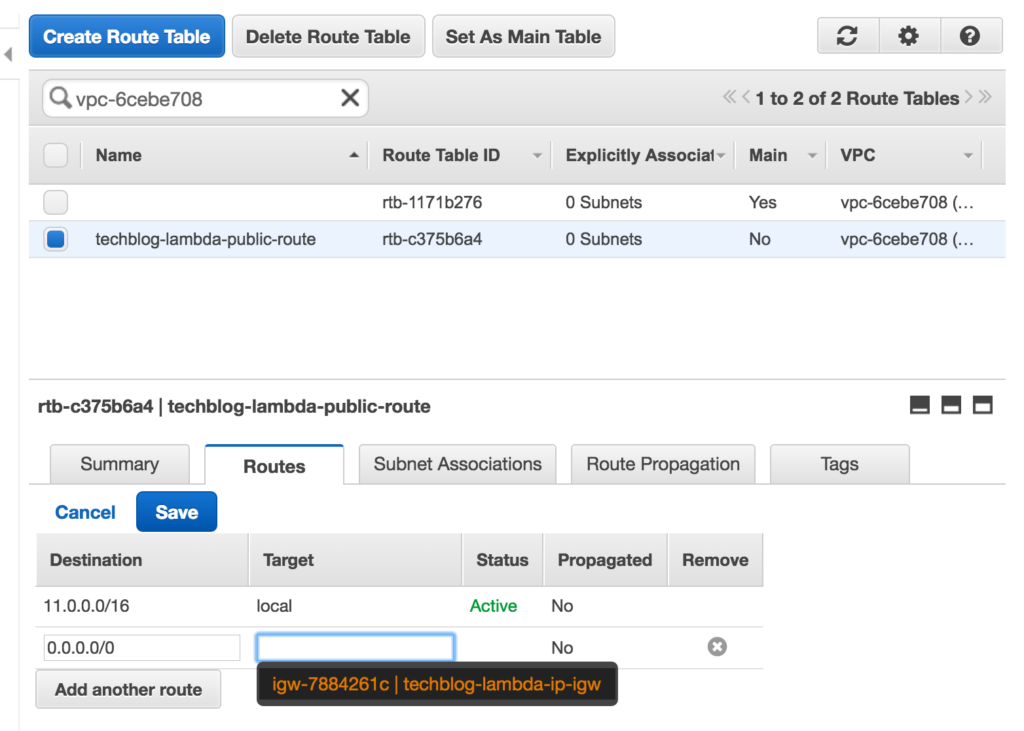
Then we need to edit this route to point it to our new internet gateway. Click on the new route, click on the Routes tab, and click edit. Then add a new route, and we will set all traffic (0.0.0.0/0) to target our internet gateway and save it:
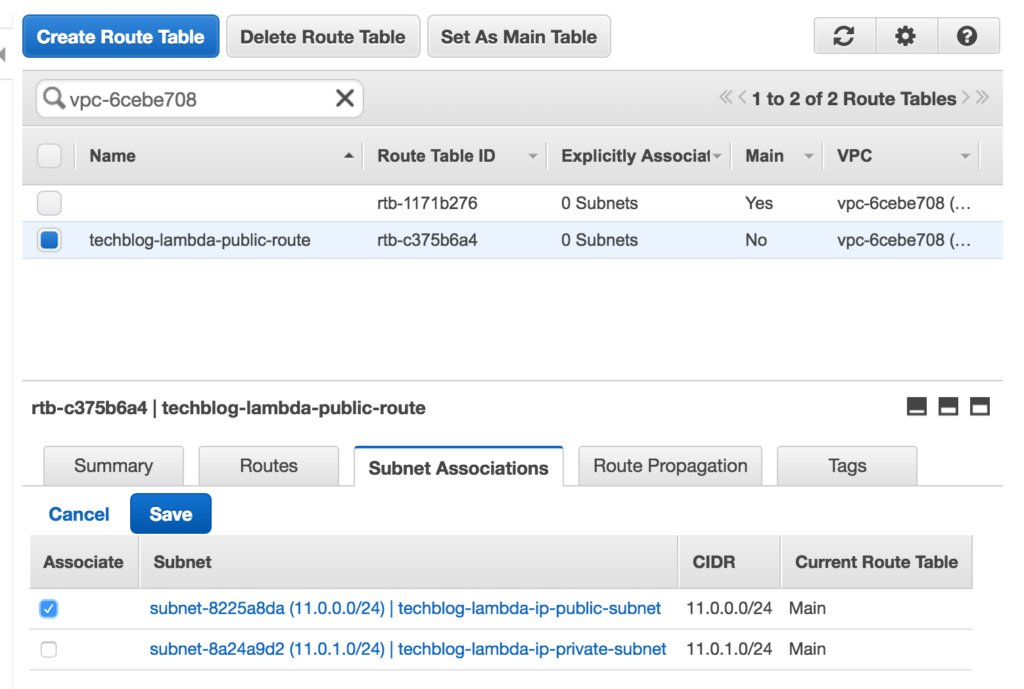
Now, click on Subnet Associations tab, click edit and, by ticking the check box by your public subnet and clicking Save, you will associate this new route to your public subnet.
Step 5: Create a NAT Gateway
First, take note of your public subnet’s id. You can see in my previous screenshot that it is subnet-8225a8da. Head over the the NAT Gateway view and click on Create NAT Gateway. On the creation screen go ahead and paste in your subnet id and click on “Create New EIP.” For example here is my new NAT Gateway with public IP of 52.43.112.142.

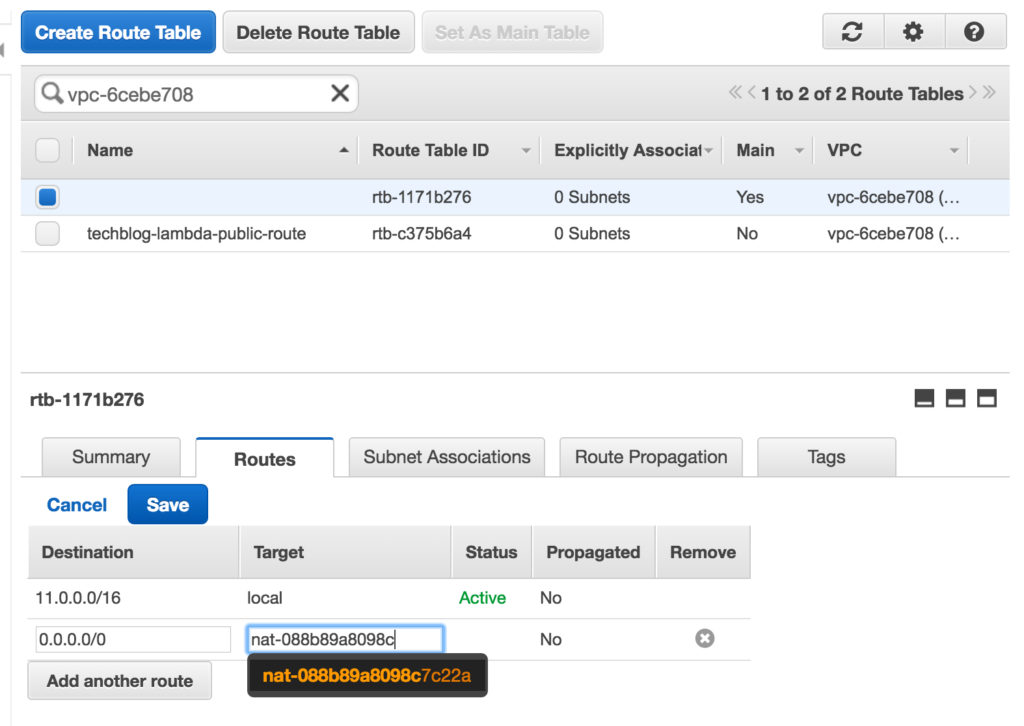
On the confirmation screen copy your nat instance id and let’s go back and edit our default route created when we created our VPC. Click on the default route (you will see the Main column for that route says Yes), click on the Routes tab, and click edit. Then add a new route, and we will set all traffic (0.0.0.0/0) to target our nat instance id and save it:
Lambda and API Gateway Configuration
Ok, now that our VPC is configured we can head over to Lambda and create/configure our new function.
Step 1: Create a new Lambda Function
On the Lambda Dashboard, click on Create a Lambda Function. On the first page, called “Select blueprint,” select the microservice-http-endpoint. This will then prompt you for API Gateway configuration options as well as Lambda configuration options.
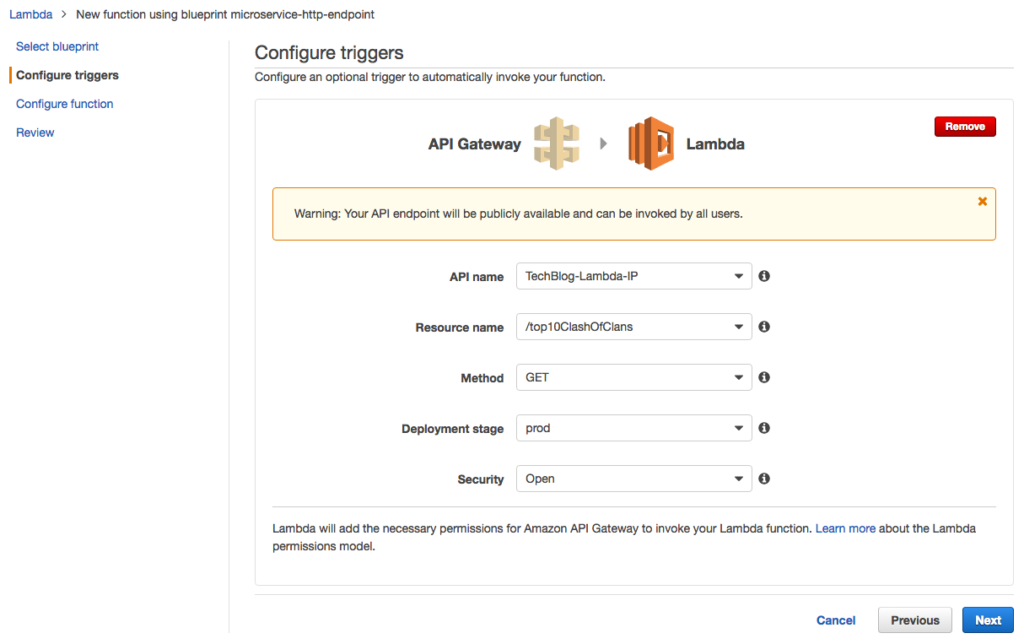
Clicking next, I then configure the trigger (API Gateway options) giving it an API name of TechBlog-Lambda-IP, a resource name of /top10ClashOfClans, set the method type to GET and deployment to prod. Lastly, for the purposes of this demo, I’m setting the Security to Open. (Note: In the real world you wouldn’t want to do this, instead you would want to use either IAM, Open with access key, or implement CORS).
Step 2: Configure our Lambda Function
On the next page we then configure our Lambda function. First, I give my function a name (e.g. topTenClashOfClans), select Node.js as my runtime and after selecting “Edit code inline” for the code entry type, I paste in the below code (NOTE: ideally your key doesn’t reside as clear text in your code, instead you can leverage KMS encryption, but that’s a post for another day):
'use strict';
var http = require('https');
console.log('Loading function');exports.handler = function(event, context) {
  console.log('start request to ' +
    "https://api.clashofclans.com" +
    "/v1/locations/32000006/rankings/clans?limit=10");
  var options = {
    "method": "GET",
    "hostname": "api.clashofclans.com",
    "port": null,
    "path": "/v1/locations/32000006/rankings/clans?limit=10",
    "headers": {
      "authorization": "Bearer SUPER_SECRET_KEY",
      "cache-control": "no-cache"
    }
  };var req = http.request(options);
  req.on('response', function(res) {
    var chunks = [];res.on("data", function (chunk) {
      chunks.push(chunk);
    });res.on("end", function () {
      var body = Buffer.concat(chunks);
      console.log("Got response: " + body.toString());
      context.succeed(body.toString());
    });
  })
  req.on('error', function(e) {
    console.log("Got error: " + e.message);
    context.done(null, 'FAILURE');
  });
  req.end();console.log('end request to ' +
    "https://api.clashofclans.com" +
    "/v1/locations/32000006/rankings/clans?limit=10");
}
Below the code block you will now need to create a role and configure your VPC settings. I selected our newly minted VPC along with our private subnet. For example:
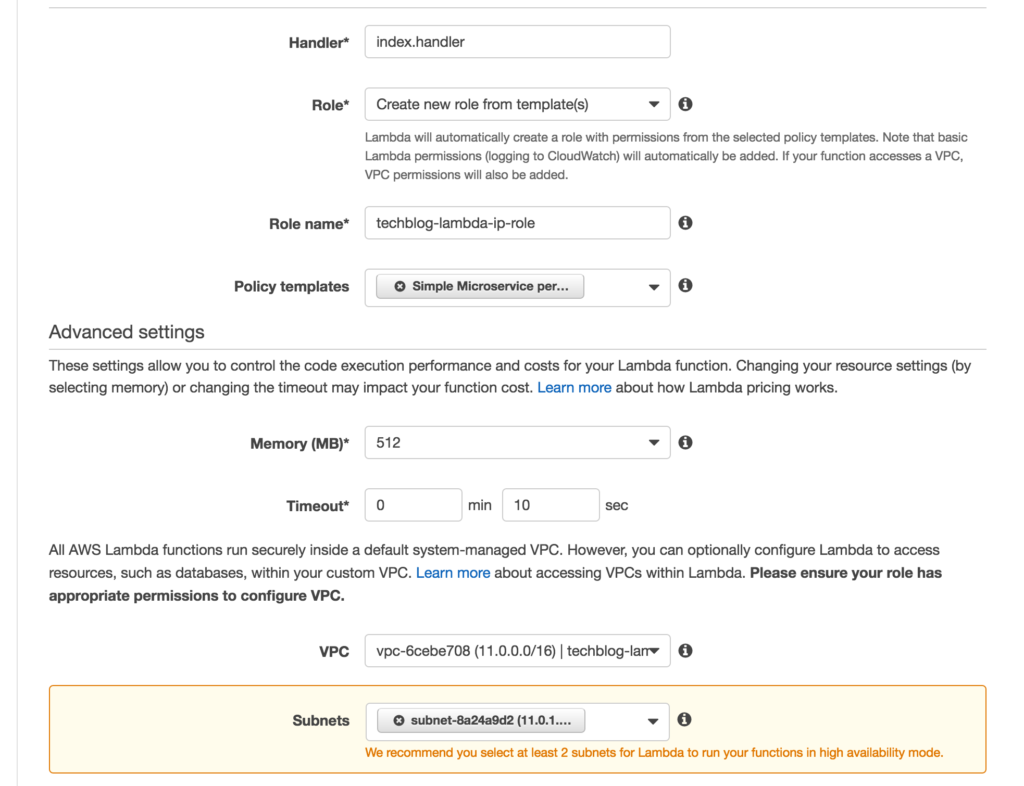
Below that I also selected the default security group. (Note: in production you would want to have this tightened down a bit more. Like for example, only allowing outgoing and inbound traffic via HTTPS.) Finally click next, verify your details and click on Create function.
So we did quite a lot of configurations between our Lambda service and in our VPC, but it is important to note that this was all done manually to better understand the interconnectivity of each resource. Ideally you would instead use something like AWS CloudFormation, Terraform by HashiCorp, etc. where you can spin up your complete stack or even subsequently destroy it with one click.
Clash Of Clans API configuration
Hopping on over to the Clash of Clans developer portal, I now need to tell them about my new IP address as well as download my auth key.
Step 1: Create a Key
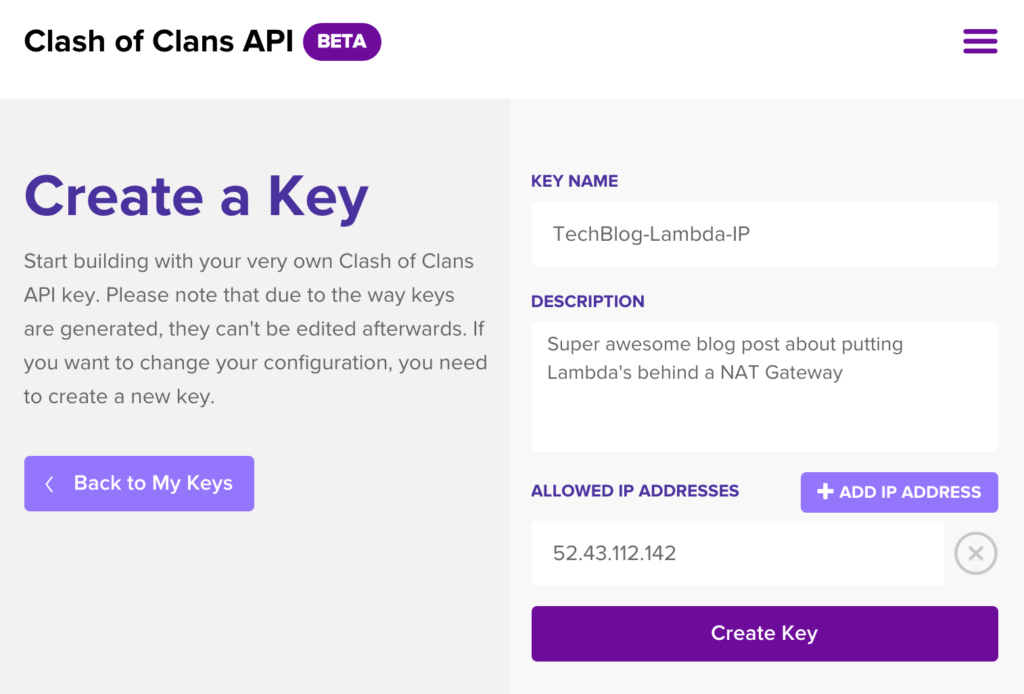
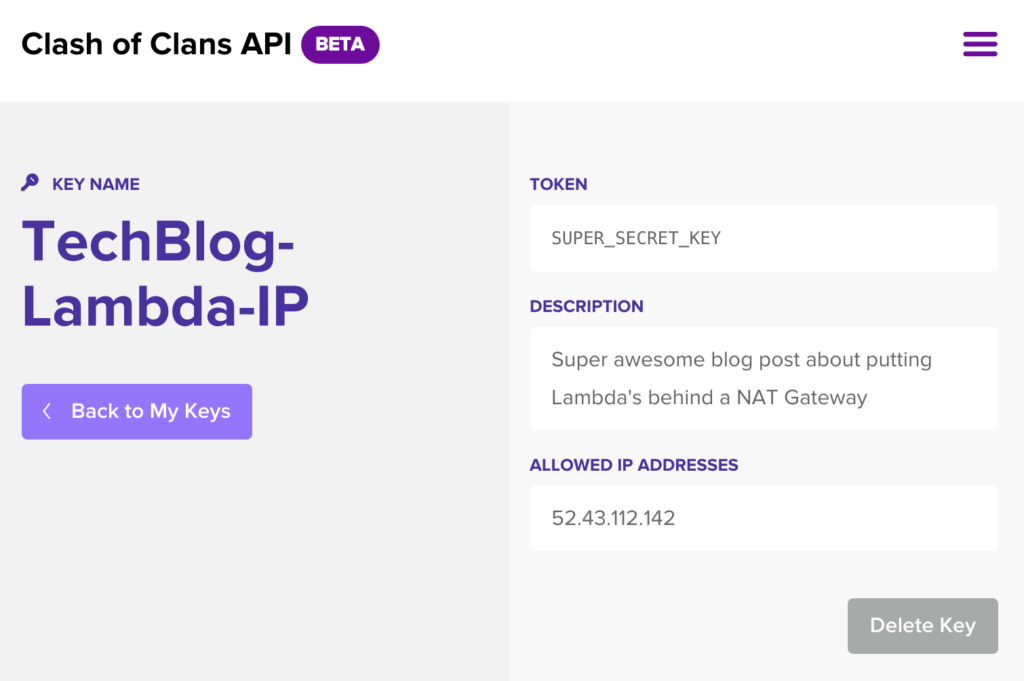
To create a key, I need to give my key a name, and description and tell them the IP address I’ll be using. (At this point you might want to create separate keys for each environment and use your API Gateway configuration to tell your Lambda service what environment it is running in and therefore which key it should use.) So for example their UI looks like this:
Step 2: Get Authentication Token
Upon clicking Create Key I now get my token which I’ll update my lambda code with:
Testing it out
Now that my VPC has been configured, my lambda function is configured, Clash of Clans now knows my IP and I got my super secret key, I can know test out my API. Head over to the triggers tab of your Lambda service and you can see your API Gateway url. This is the url you will call from your application:
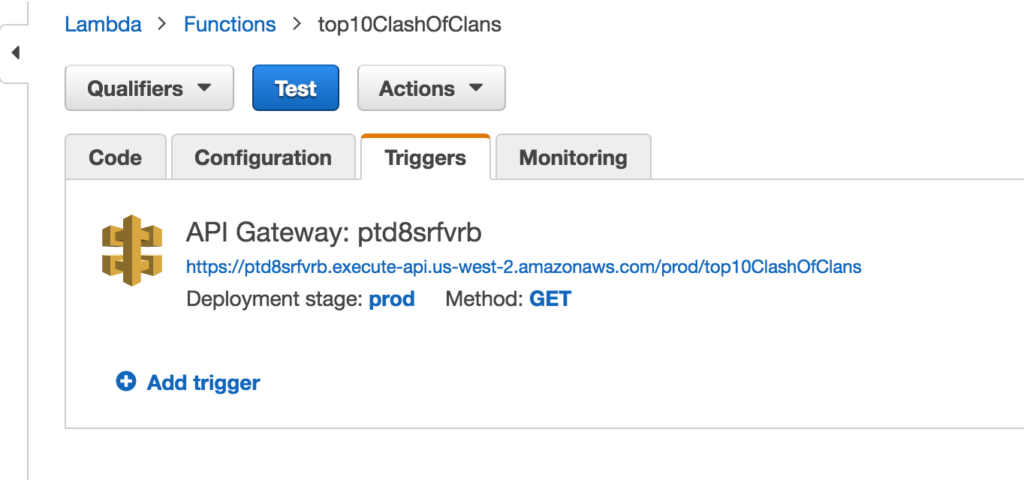
If I head over to my browser and paste it in. Here is my snazzy JSON response from my lambda service, from Clash of Clans:
{
   "items":[
      {
         "tag":"#2VR2YY0G",
         "name":"Kings Rock",
         "location":{
            "id":32000006,
            "name":"International",
            "isCountry":false
         },
         "badgeUrls":{
            "small":"https://api-assets.clashofclans.com/badges/70/H_UNCwAz5F5o9SnxYPEqwhE8tijdg5ztf8Ffi_y20as.png",
            "large":"https://api-assets.clashofclans.com/badges/512/H_UNCwAz5F5o9SnxYPEqwhE8tijdg5ztf8Ffi_y20as.png",
            "medium":"https://api-assets.clashofclans.com/badges/200/H_UNCwAz5F5o9SnxYPEqwhE8tijdg5ztf8Ffi_y20as.png"
         },
         "clanLevel":10,
         "members":50,
         "clanPoints":56417,
         "rank":1,
         "previousRank":1
      },
      {
         "tag":"#2JGYRJVL",
         "name":"MEGA EMPIRE",
         "location":{
            "id":32000006,
            "name":"International",
            "isCountry":false
         },
         "badgeUrls":{
            "small":"https://api-assets.clashofclans.com/badges/70/P51qQIW5aDVBI6ePeuj1u7anlf1qaDVr0qPQdAgSmXQ.png",
            "large":"https://api-assets.clashofclans.com/badges/512/P51qQIW5aDVBI6ePeuj1u7anlf1qaDVr0qPQdAgSmXQ.png",
            "medium":"https://api-assets.clashofclans.com/badges/200/P51qQIW5aDVBI6ePeuj1u7anlf1qaDVr0qPQdAgSmXQ.png"
         },
         "clanLevel":8,
         "members":49,
         "clanPoints":55883,
         "rank":2,
         "previousRank":2
      },
      {
         "tag":"#YJLRUQY8",
         "name":"HOUSE of CLOUDS",
         "location":{
            "id":32000006,
            "name":"International",
            "isCountry":false
         },
         "badgeUrls":{
            "small":"https://api-assets.clashofclans.com/badges/70/uYP4fFjKjVCPEHxLSTji76wGgLRGDp-C60_oZI2B9fQ.png",
            "large":"https://api-assets.clashofclans.com/badges/512/uYP4fFjKjVCPEHxLSTji76wGgLRGDp-C60_oZI2B9fQ.png",
            "medium":"https://api-assets.clashofclans.com/badges/200/uYP4fFjKjVCPEHxLSTji76wGgLRGDp-C60_oZI2B9fQ.png"
         },
         "clanLevel":7,
         "members":50,
         "clanPoints":55123,
         "rank":3,
         "previousRank":4
      },
      {
         "tag":"#PCG9G0L2",
         "name":"Come & Take It",
         "location":{
            "id":32000006,
            "name":"International",
            "isCountry":false
         },
         "badgeUrls":{
            "small":"https://api-assets.clashofclans.com/badges/70/FDV-1GfIK5FxhTDgR5JdEOr1XJ4NGO8mUvO0STYRyi4.png",
            "large":"https://api-assets.clashofclans.com/badges/512/FDV-1GfIK5FxhTDgR5JdEOr1XJ4NGO8mUvO0STYRyi4.png",
            "medium":"https://api-assets.clashofclans.com/badges/200/FDV-1GfIK5FxhTDgR5JdEOr1XJ4NGO8mUvO0STYRyi4.png"
         },
         "clanLevel":10,
         "members":48,
         "clanPoints":54821,
         "rank":4,
         "previousRank":3
      },
      {
         "tag":"#PV0UP0Y",
         "name":"GULF KNIGHTS",
         "location":{
            "id":32000006,
            "name":"International",
            "isCountry":false
         },
         "badgeUrls":{
            "small":"https://api-assets.clashofclans.com/badges/70/HZWcNNf5_I3CCV7gGPG0GmZJ6OFKUFB9N1dNxeX5xUY.png",
            "large":"https://api-assets.clashofclans.com/badges/512/HZWcNNf5_I3CCV7gGPG0GmZJ6OFKUFB9N1dNxeX5xUY.png",
            "medium":"https://api-assets.clashofclans.com/badges/200/HZWcNNf5_I3CCV7gGPG0GmZJ6OFKUFB9N1dNxeX5xUY.png"
         },
         "clanLevel":8,
         "members":45,
         "clanPoints":54063,
         "rank":5,
         "previousRank":5
      },
      {
         "tag":"#2JG20YYU",
         "name":"kurdistan is 1",
         "location":{
            "id":32000006,
            "name":"International",
            "isCountry":false
         },
         "badgeUrls":{
            "small":"https://api-assets.clashofclans.com/badges/70/K4OvVfQow1H4pRmjrdy1t6ev49M6LcGZfU6EdsPWTRQ.png",
            "large":"https://api-assets.clashofclans.com/badges/512/K4OvVfQow1H4pRmjrdy1t6ev49M6LcGZfU6EdsPWTRQ.png",
            "medium":"https://api-assets.clashofclans.com/badges/200/K4OvVfQow1H4pRmjrdy1t6ev49M6LcGZfU6EdsPWTRQ.png"
         },
         "clanLevel":10,
         "members":47,
         "clanPoints":53553,
         "rank":6,
         "previousRank":6
      },
      {
         "tag":"#8PCL0Y9J",
         "name":"BRASIL TEAM",
         "location":{
            "id":32000006,
            "name":"International",
            "isCountry":false
         },
         "badgeUrls":{
            "small":"https://api-assets.clashofclans.com/badges/70/l7PnLiAsZG8WNPKBiGdSmzmzQGHMj8hsd2_AUoQ3vtc.png",
            "large":"https://api-assets.clashofclans.com/badges/512/l7PnLiAsZG8WNPKBiGdSmzmzQGHMj8hsd2_AUoQ3vtc.png",
            "medium":"https://api-assets.clashofclans.com/badges/200/l7PnLiAsZG8WNPKBiGdSmzmzQGHMj8hsd2_AUoQ3vtc.png"
         },
         "clanLevel":8,
         "members":50,
         "clanPoints":53103,
         "rank":7,
         "previousRank":7
      },
      {
         "tag":"#9QCJGJPY",
         "name":"FACÇÃO CENTRAL",
         "location":{
            "id":32000006,
            "name":"International",
            "isCountry":false
         },
         "badgeUrls":{
            "small":"https://api-assets.clashofclans.com/badges/70/m3q5ZFSiIDDTFHIEtZfuLlQFXgvovohntlW1IMC4IMM.png",
            "large":"https://api-assets.clashofclans.com/badges/512/m3q5ZFSiIDDTFHIEtZfuLlQFXgvovohntlW1IMC4IMM.png",
            "medium":"https://api-assets.clashofclans.com/badges/200/m3q5ZFSiIDDTFHIEtZfuLlQFXgvovohntlW1IMC4IMM.png"
         },
         "clanLevel":9,
         "members":50,
         "clanPoints":52997,
         "rank":8,
         "previousRank":-1
      },
      {
         "tag":"#Q0909PUG",
         "name":"Los Inmortales",
         "location":{
            "id":32000006,
            "name":"International",
            "isCountry":false
         },
         "badgeUrls":{
            "small":"https://api-assets.clashofclans.com/badges/70/SxnbX9hipl2xGrQUEz9G037jTLVI3gKv3hh_etgKiaw.png",
            "large":"https://api-assets.clashofclans.com/badges/512/SxnbX9hipl2xGrQUEz9G037jTLVI3gKv3hh_etgKiaw.png",
            "medium":"https://api-assets.clashofclans.com/badges/200/SxnbX9hipl2xGrQUEz9G037jTLVI3gKv3hh_etgKiaw.png"
         },
         "clanLevel":9,
         "members":49,
         "clanPoints":51763,
         "rank":9,
         "previousRank":-1
      },
      {
         "tag":"#YRPJ280Y",
         "name":"Req and Leave",
         "location":{
            "id":32000006,
            "name":"International",
            "isCountry":false
         },
         "badgeUrls":{
            "small":"https://api-assets.clashofclans.com/badges/70/CHUt9lOScEJ0m0CeUTha8KdTpVZ73oqQxhNunoI0BLw.png",
            "large":"https://api-assets.clashofclans.com/badges/512/CHUt9lOScEJ0m0CeUTha8KdTpVZ73oqQxhNunoI0BLw.png",
            "medium":"https://api-assets.clashofclans.com/badges/200/CHUt9lOScEJ0m0CeUTha8KdTpVZ73oqQxhNunoI0BLw.png"
         },
         "clanLevel":8,
         "members":49,
         "clanPoints":51163,
         "rank":10,
         "previousRank":10
      }
   ],
   "paging":{
      "cursors":{
         "after":"eyJwb3MiOjEwfQ"
      }
   }
}
In Conclusion
So there you have it. The fact that our API call returned successfully, proves that the Clash Of Clans APIs where able to verify that 1) we called from the IP we said we would call from, 2) we used the token they created for us, and 3) we made our call via SSL.
Granted, there are definitely quite a few shortcuts we took in this implementation where security could be tightened up. This is in no way a productized implementation. It is, instead, an over simplified POC on demonstrating the new relationship between AWS Lambda and AWS VPCs. We have proven that we can use AWS VPC infrastructure to configure a AWS Lambda to use a static outgoing IP. This allows for tighter security when locking down who has rights to access your APIs. In our business case we can now say that our microservices connecting via SSL, using a security token X, as well as, a calling from IP X.X.X.X can access our financial resources is a fully trusted consumer, and any other connection is blocked from accessing those same resources.
Feel free to take a spin with the above instructions and provide any comments or feedback on this implementation.
